Changing the margins on Google Docs is an essential skill for anyone looking to create professional documents. Whether you're drafting a report, writing a research paper, or preparing a resume, the margins can significantly impact the overall appearance and readability of your document. In this guide, we will explore the various methods to adjust the margins in Google Docs, ensuring that your documents look polished and well-structured.
Understanding how to change the margins is not only convenient but also a vital aspect of document formatting. Margins help define the space around your text, guiding the reader's eye and enhancing the overall presentation. In this article, we will cover step-by-step instructions, tips for setting custom margins, and troubleshooting common issues.
By the end of this guide, you'll be equipped with the knowledge to modify margins effectively, allowing you to create documents that meet your specific needs. So, let’s dive in and explore how to change the margins on Google Docs!
Table of Contents
- Understanding Margins
- Default Margin Settings in Google Docs
- Changing Margins Using Page Setup
- Changing Margins Using the Ruler
- Customizing Margins for Specific Documents
- Common Issues and Solutions
- Tips for Effective Document Formatting
- Conclusion
Understanding Margins
Margins are the blank spaces that surround the content of your document. They play a crucial role in the layout and readability of your text. Here are some key points to understand about margins:
- Types of Margins: There are four main types of margins: top, bottom, left, and right.
- Standard Measurements: The standard margin size in most documents is 1 inch on all sides, but this can vary based on requirements.
- Importance: Proper margins enhance readability and ensure that content does not get cut off when printed.
Default Margin Settings in Google Docs
When you create a new document in Google Docs, it automatically sets the margins to a default of 1 inch. This setting can be changed based on your preferences. Here’s how to view and adjust your default margin settings:
- Open a new or existing Google Docs document.
- Go to "File" in the top menu.
- Select "Page setup." Here, you will see the current margin settings.
Changing Margins Using Page Setup
One of the most straightforward ways to change margins is through the Page Setup menu. Follow these steps:
- Click on "File" in the top menu.
- Select "Page setup." A dialog box will appear.
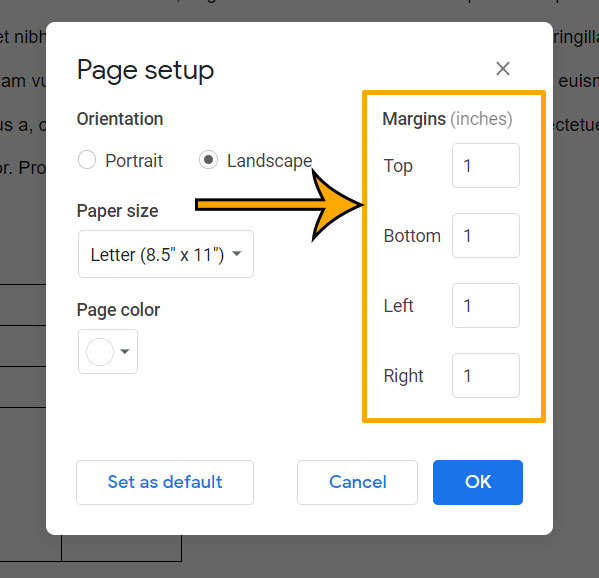
- In the dialog box, you will see fields for "Top," "Bottom," "Left," and "Right" margins.
- Enter your desired margin sizes (in inches) in the respective fields.
- Click "OK" to apply the changes.
Example of Adjusting Margins
If you want to increase the left margin to 1.5 inches for better readability, simply enter "1.5" in the left margin field and click "OK." This change will apply to the entire document.
Changing Margins Using the Ruler
Another method to adjust margins is by using the ruler at the top of your Google Docs document. To use this feature, follow these steps:
- Ensure that the ruler is visible. If not, click on "View" in the top menu and select "Show ruler."
- To adjust the left margin, click and drag the gray area on the left side of the ruler.
- To adjust the right margin, drag the gray area on the right side of the ruler.
Visual Guide to Using the Ruler
The ruler provides a visual representation of your margins, making it easy to see how they relate to your content. This method offers a quick way to modify margins without opening additional menus.
Customizing Margins for Specific Documents
Sometimes, you may need to customize margins for specific types of documents, such as resumes or reports. Here are a few tips:
- Resumes: Consider using smaller margins (0.5 to 0.75 inches) to maximize space.
- Reports: Wider margins (1.25 to 1.5 inches) can help with readability and provide space for comments.
- Creative Documents: For creative projects, experiment with varying margin sizes to achieve a unique look.
Common Issues and Solutions
While changing margins is generally straightforward, you may encounter some common issues. Here are some solutions:
- Margins Not Changing: Ensure that you are not in "Print Layout" view. Switch to "Editing" mode to see changes.
- Content Overlapping Margins: If text overlaps the margins, check for any text boxes or images that may be causing the issue.
Tips for Effective Document Formatting
To ensure your documents look polished, consider these formatting tips:
- Consistently use the same margin settings throughout the document.
- Preview your document before printing to ensure margins appear as expected.
- Utilize headings and subheadings to create a clear structure.
Conclusion
Changing the margins on Google Docs is a simple yet crucial aspect of document formatting. By following the steps outlined in this guide, you can easily adjust margins to suit your needs, whether for academic papers, professional reports, or personal projects. Remember to experiment with different margin sizes to find what works best for your specific document type.
We encourage you to leave a comment below if you have any questions or share your own tips for formatting documents in Google Docs. Don’t forget to check out our other articles for more helpful insights!
Penutup
Thank you for reading this comprehensive guide on how to change the margins on Google Docs. We hope you found the information useful and that you'll return for more valuable tips and tricks. Happy document editing!