Imagine this: You've just arrived home, excited to try on your new purchase, only to discover that the store forgot to remove the security tag. That sinking feeling of frustration sets in, and the thought of making another trip all the way back to the store is utterly unappealing. Fortunately, you can get a security tag off at home without taking a trip all the way back to the store. This guide is designed to empower you with the knowledge and techniques to safely and effectively remove various types of clothing security tags right from the comfort of your own home, saving you time and hassle.
Dealing with a forgotten security tag can be a minor inconvenience, but it doesn't have to ruin your day or your new garment. We've put together an entire list of easy methods to safely and effectively address this common oversight. Luckily, there are several ways to remove a security tag from clothing at home, but each method depends on the type of tag and your available tools. This comprehensive guide will walk you through everything you need to know, from identifying the different types of tags to the specific tools and techniques required for their removal.
Understanding Security Tags: What Are They and Why Do They Exist?
Before diving into the methods of removal, it's crucial to understand what a security tag is and its purpose. A security tag is a small signal transmitter that firms attach to their products, primarily clothing, to prevent theft. These tags are part of an Electronic Article Surveillance (EAS) system. When an item with an active tag passes through sensors at the store's exit, an alarm sounds, alerting staff to potential shoplifting.
The design of these tags is intentionally robust, making them difficult to remove without specialized tools, which are typically only available to store employees. This design ensures that merchandise remains secure until it's legitimately purchased and the tag is deactivated or removed at the point of sale. However, human error does occur, and sometimes these tags are left on, leading to the dilemma of how to remove clothing security tag at home.
Understanding the basic mechanics behind these tags – a pin that pierces the fabric, locking into a clasp mechanism – is the first step towards safely disengaging them. Knowing their purpose also reinforces the importance of handling them carefully, especially those containing ink, to avoid damaging your newly acquired item.
Types of Security Tags: Knowing Your Opponent
Not all security tags are created equal. There are three main types of security tags you're likely to encounter, and each requires a different method for removal. Identifying the type of tag on your clothing is the critical first step in choosing the right approach to remove clothing security tag without damage.
Magnet Release Tags
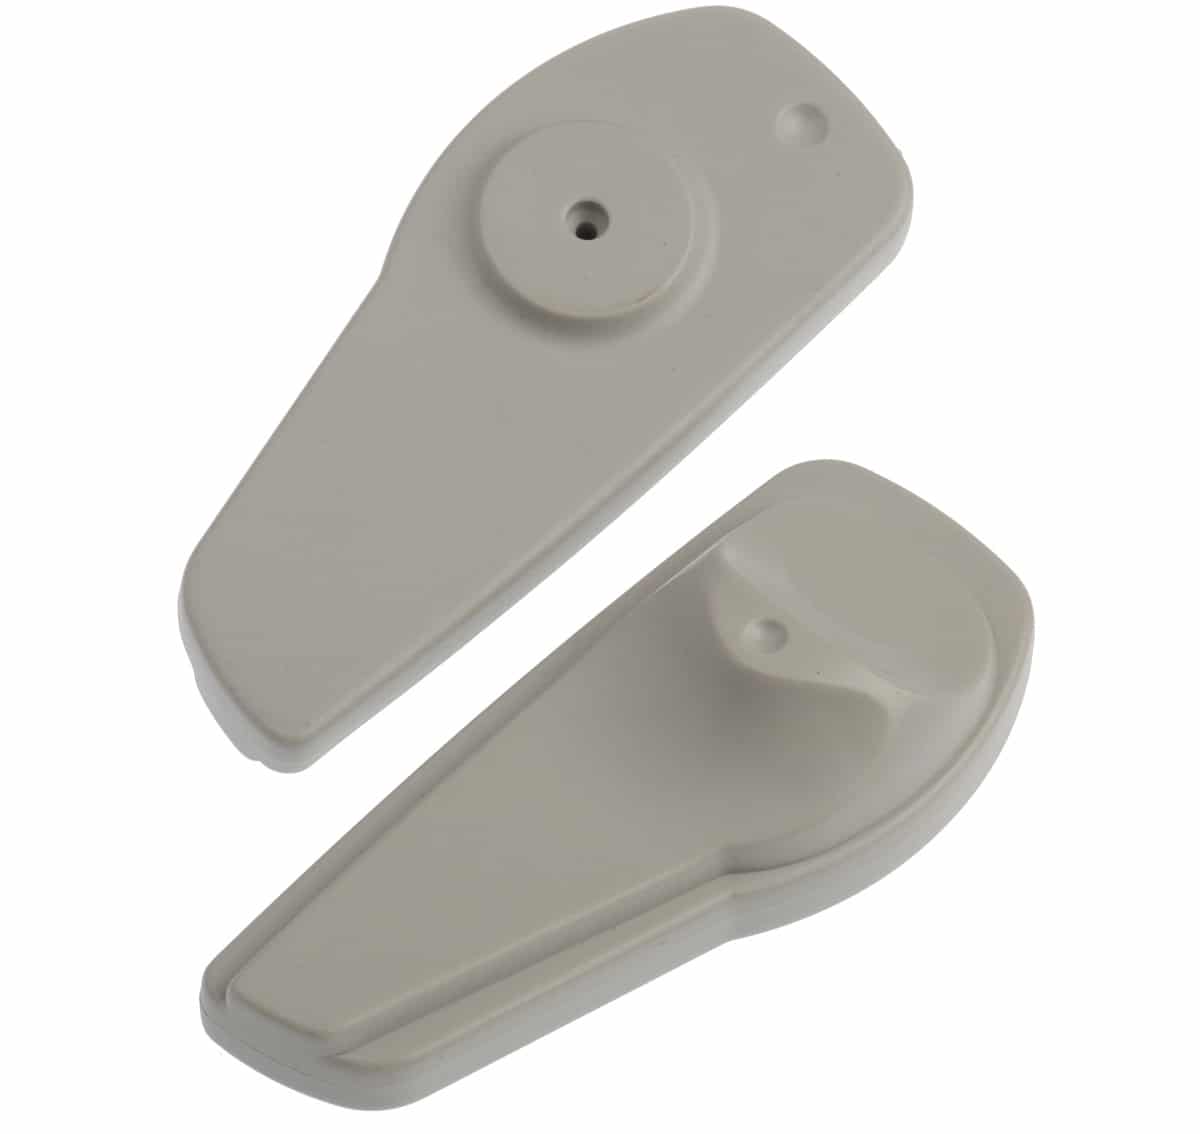
These are perhaps the most common and often the easiest to remove with the right tools. Magnet release tags typically have a smooth, often round or rectangular, hard plastic casing. Inside, they contain a spring-loaded mechanism that is released by a powerful magnet. When a strong magnet is applied to a specific point on the tag, it retracts a pin or ball bearings, allowing the two halves of the tag to separate. These tags are designed for quick and efficient removal at the checkout counter using a specialized magnetic detacher.
Clamp and Pin Tags
Also very common, clamp and pin tags (sometimes called "hard tags" or "clutch tags") consist of two parts: a main body that houses the locking mechanism and a pin that goes through the fabric and locks into the body. These tags don't rely on magnets for release. Instead, they use a mechanical clutch or a series of small metal balls that grip the pin. To remove them, you typically need to apply pressure or manipulate the pin in a way that bypasses the internal locking mechanism. They often have a more robust, sometimes ribbed or textured, plastic casing compared to magnet tags.
Ink Tags: The Risky Ones
Ink tags are a subset of either magnet release or clamp and pin tags, but with a crucial difference: they contain small vials of indelible ink. These tags are designed to burst and release ink onto the garment if tampered with or removed improperly, rendering the item unsellable and discouraging theft. Generally speaking, to remove an ink security tag, you need to be extremely cautious. The ink cartridge is usually located within the main body of the tag, and any undue pressure, twisting, or prying can cause it to rupture. Identifying an ink tag is crucial; they often have a clear warning label, a visible ink vial, or a distinct design indicating their presence. These are the most challenging and risky tags to remove at home due to the high potential for permanent damage to your clothing.
Understanding these distinctions is paramount. Attempting a magnet method on a clamp tag, or worse, prying an ink tag, can lead to frustration, damaged clothing, or a permanent ink stain. Always take a moment to inspect the tag carefully before proceeding with any removal method.
General Precautions Before You Start
Before you attempt to remove clothing security tag at home, it's vital to take a few precautions to ensure your safety and protect your garment. Remember, while these methods are effective, they require care and precision.
- Verify Ownership: This guide assumes you have legitimately purchased the item and the tag was simply left on by mistake. Attempting to remove security tags from stolen merchandise is illegal and unethical.
- Protect Your Garment: Always place a thick towel or a piece of cardboard inside the garment, directly under the tag, especially if you're working with tools that might slip or apply pressure. This acts as a barrier to prevent accidental damage to the fabric.
- Wear Protective Gear: If using tools like pliers, screwdrivers, or especially a Dremel, wear safety glasses to protect your eyes from flying plastic shards. Gloves can also provide a better grip and protect your hands.
- Work in a Well-Lit Area: Good lighting is essential for seeing what you're doing and minimizing the risk of errors.
- Patience is Key: Do not rush the process. Rushing increases the likelihood of damaging the clothing or injuring yourself. If a method isn't working, stop and reassess rather than forcing it.
- Identify Ink Tags: As mentioned, ink tags are the riskiest. If you suspect your tag contains ink, proceed with extreme caution. Consider placing the tag inside a plastic bag before attempting removal to contain any potential ink spills.
By adhering to these precautions, you significantly increase your chances of a successful and damage-free security tag removal.
Method 1: The Rare Earth Magnet Approach
This method is highly effective for magnet release tags, which are common in many retail environments. To remove a clothing security tag using this technique, you’ll need a rare earth magnet, similar to the magnets found in computer hard drives or powerful neodymium magnets available online. These magnets are significantly stronger than typical refrigerator magnets and are necessary to disengage the internal locking mechanism.
What You'll Need:
- A strong rare earth (neodymium) magnet.
- The garment with the security tag.
- A soft surface (e.g., a towel) to work on.
Step-by-Step Instructions:
- Identify the Magnet Release Point: Examine the security tag. Most magnet release tags have a small indentation, a slightly raised circle, or a flat, smooth area on one side. This is typically where the internal locking mechanism is located.
- Position the Garment: Lay the garment flat on a soft surface, ensuring the tag is easily accessible.
- Apply the Magnet: Place the rare earth magnet directly onto the identified release point on the security tag. You might need to experiment with the exact positioning. The goal is to align the magnet with the internal spring-loaded pin or ball bearings that hold the tag in place.
- Apply Gentle Pressure: While holding the magnet firmly in place, gently pull the two halves of the tag apart. You should feel a slight click or release as the internal mechanism disengages. If it doesn't release immediately, try sliding the magnet around the release point slightly, maintaining firm contact.
- Separate the Tag: Once you feel the release, the two halves of the tag should easily come apart, allowing you to remove the pin from the fabric.
- Inspect the Garment: After removal, carefully inspect the fabric for any signs of damage or stretching where the pin was inserted.
This method is generally safe and effective for the correct type of tag. The key is the strength and proper placement of the magnet. Don't panic—returning to the store isn’t your only option, especially with the right tools at hand.
Method 2: The Rubber Band Technique for Pin Tags
This method is surprisingly effective for many clamp and pin type security tags, particularly those without ink. It leverages the principle of applying gradual, sustained pressure to dislodge the pin from its locking mechanism. This is a low-risk method for the garment, as it doesn't involve sharp tools.
What You'll Need:
- Several strong rubber bands (the thicker, the better).
- The garment with the security tag.
- A sturdy, flat surface.
Step-by-Step Instructions:
- Position the Tag: Hold the garment so that the larger, main body of the security tag is facing upwards, and the smaller pin head is on the underside.
- Gather Rubber Bands: Take several rubber bands and loop them together to create a strong, thick band.
- Wrap Around the Pin: Carefully wrap the looped rubber bands around the small, protruding pin head of the security tag, ensuring they are snug against the fabric.
- Stretch and Pull: Now, stretch the rubber bands as far as you can, pulling them away from the main body of the tag. The goal is to create significant tension on the pin.
- Wiggle and Work: While maintaining the tension on the rubber bands, gently wiggle the main body of the tag. The constant, outward pressure from the rubber bands, combined with the wiggling, can often cause the internal ball bearings or clutch mechanism to release its grip on the pin.
- Listen for the Click: You might hear a small click or feel a sudden release when the pin comes loose. Continue wiggling and pulling until the tag separates.
- Remove and Inspect: Once the tag is off, remove the rubber bands and inspect your clothing for any stretching or damage.
This method requires patience and a good amount of tension, but it's a non-invasive way to remove clothing security tag without resorting to more aggressive tools. It's particularly useful when you don't have specialized equipment.
Method 3: The Fork or Screwdriver Lever Method
This method is suitable for certain types of clamp and pin tags that have a small gap or seam where a prying tool can be inserted. It requires careful application of leverage to separate the two halves of the tag. This method carries a slightly higher risk of damaging the tag or the garment if not performed carefully, especially if it's an ink tag.
What You'll Need:
- A sturdy fork (with flat tines) or a small, flat-head screwdriver.
- The garment with the security tag.
- A thick towel or cardboard to protect the garment.
- Safety glasses (recommended).
Step-by-Step Instructions:
- Examine the Tag: Look for a seam, a small gap, or a point where the two halves of the tag meet and appear to be slightly separable. Some tags have a small notch or a weak point designed for a store detacher, which you might be able to exploit.
- Prepare the Garment: Lay the garment flat and place a thick towel or piece of cardboard directly under the tag to protect the fabric from accidental prying or slipping.
- Insert the Tool: Carefully insert the tines of the fork or the tip of the flat-head screwdriver into the identified seam or gap between the two halves of the tag. Be extremely cautious not to pierce the fabric.
- Apply Gentle Leverage: Once the tool is securely inserted, apply gentle, steady leverage. The goal is to pry the two halves of the tag apart just enough to disengage the internal locking mechanism. Avoid excessive force, as this can break the tag (and potentially release ink if it's an ink tag) or damage the garment.
- Wiggle and Pry: You might need to wiggle the tool slightly or try different angles. The aim is to release the internal clutch that grips the pin. This often involves bending or cutting the internal metal pins attached through the clothing and the two halves of the tag. You should be able to bend or cut these if they become exposed.
- Separate the Tag: Once the internal mechanism is disengaged, the two halves should separate, allowing you to remove the tag from the clothing.
- Inspect for Damage: Thoroughly check your garment for any rips, tears, or stretching caused by the prying action.
This method requires a delicate touch and a good understanding of the tag's structure. It's more effective on tags that have a clear seam or a less robust casing.
Method 4: The Dremel or Cutting Tool Approach for Stubborn Tags
This is a more aggressive method and should be considered a last resort, especially if you're dealing with a particularly stubborn clamp-style tag that doesn't respond to other techniques. It involves carefully cutting away part of the tag to expose the internal pin. This method carries the highest risk of garment damage and personal injury, and should absolutely not be attempted on ink tags.
What You'll Need:
- A Dremel rotary tool with a cutting wheel or a strong pair of wire cutters/pliers.
- Safety glasses.
- Work gloves.
- A thick towel or piece of cardboard to protect the garment.
- A well-ventilated area.
Step-by-Step Instructions:
- Safety First: Put on your safety glasses and work gloves. Ensure you are in a well-lit and well-ventilated area.
- Protect the Garment: Lay the garment flat and place a thick towel or piece of cardboard directly under the security tag. This is crucial to prevent the cutting tool from accidentally damaging the fabric.
- Identify the Target: For many clamp tags, the locking mechanism is housed within a small pyramid, nipple, or dome-shaped protrusion on one side of the tag. This is your target.
- Careful Cutting (Dremel): If using a Dremel, select a small cutting wheel. Carefully and slowly slice off the pyramid or nipple with the Dremel. The goal is to remove just enough plastic to expose the metal pin or the internal locking mechanism without cutting into the pin itself or the fabric. This should reveal metal pins attached through the clothing and the two halves of the tag.
- Cutting (Wire Cutters/Pliers): If using strong wire cutters or pliers, you might be able to carefully grip and snip the small plastic piece that holds the pin in place, or even the pin itself if it's exposed and accessible. Be extremely careful not to cut the fabric.
- Bend or Cut the Pin: Once the internal mechanism or the base of the pin is exposed, you should be able to bend or cut the metal pin that runs through the clothing, allowing the two halves of the tag to separate.
- Remove and Inspect: Carefully remove the tag pieces and inspect your garment for any damage, melting (if using a Dremel), or stray plastic shards.
This method is irreversible and should only be used as a last resort for non-ink tags. Precision and caution are paramount to avoid damaging your clothing or injuring yourself.
What to Do if an Ink Tag Breaks
Despite all precautions, accidents can happen, especially with ink tags. If an ink tag breaks and spills ink onto your clothing, immediate action is crucial to minimize the damage. Remember, the ink is designed to be difficult to remove, but quick action can improve your chances.
Immediate Steps:
- Do NOT Rub: Your first instinct might be to rub the stain, but this will only spread the ink and push it deeper into the fabric, making it harder to remove.
- Blot, Don't Rub: Gently blot the excess ink with a clean, absorbent cloth or paper towel. Continue blotting until no more ink transfers to the cloth.
- Apply Absorbent Powder: Sprinkle a generous amount of an absorbent powder like cornstarch, talcum powder, or even salt directly onto the fresh ink stain. These powders can help draw the liquid ink out of the fabric. Let it sit for at least 15-30 minutes, then gently brush off the powder. Repeat if necessary.
- Pre-Treat with Alcohol-Based Cleaner: Once the excess ink is blotted and powdered, apply an alcohol-based cleaner. Rubbing alcohol, hand sanitizer, or even hairspray (which contains alcohol) can be effective. Apply it to a clean cloth first, then gently blot the stain from the outside in to prevent spreading.
- Rinse and Wash: Rinse the affected area with cold water. Then, wash the garment according to its care label instructions, preferably with a heavy-duty detergent. You might want to wash it separately to avoid transferring ink to other clothes.
- Air Dry: Do not put the garment in a dryer until you are certain the stain is gone. Heat can set the stain, making it permanent. If the stain persists, repeat the treatment process before drying.
For particularly stubborn stains, professional dry cleaning might be your best option. Inform them that it's an ink security tag stain so they can use appropriate solvents. While it's not directly related to security tags, the general principle of troubleshooting and seeking professional help for difficult issues (like how to remove ad blocker from my pc, or how to remove email account from outlook new ui) applies here: sometimes, the best solution involves specialized knowledge or tools.
When to Consider Professional Help or Return to the Store
While this guide has outlined several methods to remove clothing security tags, ranging from the use of magnets and rubber bands to more aggressive tools, there are situations where attempting DIY removal might not be the best course of action. Remember, the key is to prioritize the safety of your garment and yourself.
When to Seek Professional Help:
- Stubborn Ink Tags: If you have an ink tag and are hesitant or unsure about the removal process, or if previous attempts have failed, it's often safer to take the item to a professional dry cleaner. They have specialized solvents and techniques for dealing with tough stains and can often remove the tag safely.
- Delicate Fabrics: For very delicate or expensive garments (silk, lace, cashmere), any DIY method carries a higher risk of damage. A professional might be better equipped to handle these materials.
- Lack of Proper Tools: If you don't have the recommended tools (e.g., a strong rare earth magnet for a magnet tag), forcing other methods can lead to damage.
When to Return to the Store:
- Proximity and Convenience: If the store is just around the corner and it's not a major inconvenience, returning the item for proper tag removal is always the safest and most straightforward option. They have the correct tools and are trained to do it.
- Proof of Purchase: Always bring your receipt or proof of purchase when returning to the store. This confirms your legitimate ownership and ensures they will assist you.
- Unsure of Tag Type: If you cannot confidently identify the type of security tag or are unsure which method to use, returning to the store eliminates guesswork and potential damage.
- Damage Concerns: If you're worried about damaging the garment, or if the tag seems unusually stubborn, a quick trip back to the retailer is often the best solution. They can help you remove the unauthorized tag and ensure your garment is secure and undamaged.
Just as you might contact Microsoft support directly to create a support ticket for an account issue, or troubleshoot payment method issues for Google Play purchases, sometimes the most effective solution for a security tag is to go to the source. Don't feel obligated to tackle every problem yourself, especially when professional assistance is readily available and often the safest bet.
Conclusion: Freedom for Your Garments
Discovering a forgotten security tag on your new clothing can be a momentary annoyance, but as this guide demonstrates, it's a problem with several practical solutions. We've explored various methods for how to remove clothing security tag, from leveraging the power of rare earth magnets to employing clever household items like rubber bands and even more robust tools like Dremels for the most stubborn cases. Each technique has its nuances, requiring careful identification of the tag type and adherence to crucial safety precautions to protect both yourself and your cherished garment.
Remember, the goal is always to free your clothing without causing any damage, especially when dealing with the tricky ink tags. While the satisfaction of a successful DIY removal is undeniable, don't hesitate to seek professional help or simply return to the store with your proof of purchase if you're unsure or uncomfortable with any of the methods. Your garment's integrity and your peace of mind are paramount.
We hope this comprehensive guide empowers you to tackle any rogue security tag with confidence and skill. Have you tried any of these methods, or do you have a unique trick up your sleeve? Share your experiences and tips in the comments below! Your insights could help fellow readers in their own security tag dilemmas.
Related Resources:

Detail Author:
- Name : Prof. Alexis Oberbrunner
- Username : tessie79
- Email : sandra68@gmail.com
- Birthdate : 1979-02-18
- Address : 760 Kling Radial Kileyside, MT 62858
- Phone : 740.495.6211
- Company : Gutmann PLC
- Job : Medical Laboratory Technologist
- Bio : Nemo molestiae eum natus adipisci et dolor maxime. Totam aut quos accusantium libero. Dolor doloremque veniam illum ipsum occaecati. Amet natus quisquam dolores ducimus veniam.
Socials
linkedin:
- url : https://linkedin.com/in/beulah.boehm
- username : beulah.boehm
- bio : Corporis qui quibusdam adipisci.
- followers : 5713
- following : 460
twitter:
- url : https://twitter.com/boehmb
- username : boehmb
- bio : Debitis earum tempore et eum dolor. Delectus consequatur ratione quae quis rem tenetur aliquid et. Nam non non ipsam beatae facere ipsum qui.
- followers : 1486
- following : 544
tiktok:
- url : https://tiktok.com/@boehmb
- username : boehmb
- bio : Aliquid eius sit illum amet velit iste.
- followers : 2160
- following : 156
facebook:
- url : https://facebook.com/beulah_boehm
- username : beulah_boehm
- bio : Animi qui omnis totam culpa sed similique. Saepe omnis est nesciunt quae quod.
- followers : 6477
- following : 375
instagram:
- url : https://instagram.com/beulahboehm
- username : beulahboehm
- bio : Rerum laudantium iusto odio nemo. Quod dolor et minima maxime. Veniam sunt id eum.
- followers : 616
- following : 2786
